| the short address of this page is
https://tinyurl.com/ITFRehearsingWithMusescore << back to main index || view resources |
contact - John Craick, ITFactotum@iinet.net.au |
REHEARSING WITH MUSESCORE - A GUIDE FOR CHORISTERS
A resource page by ITFACTOTUM
(a pdf version of this document is available here)
Overview
This paper is a guide for choristers who wish to rehearse their voice part using the Musescore music notation and playback program. It assumes that Musescore is already installed and that suitable Musescore files are already available.
Contents
- What Is Musescore ?
- Using Musescore To Rehearse Music
- What Does It Sound Like ?
- Altering The Loudness Of Voice Parts – The F10 Mixer Window.
- Changing Playback Speed – The F11 Play Panel Window
- About Musescore Files.
- Tips And Tricks I – Navigation
- Tips and Tricks II - Ignore “Corrupted” Files
- Rehearsing with Musescore vs mp3 files
- Making your own mp3 voice parts
1. What is Musescore ?
MuseScore is a free music notation program that works on PCs, Macs & Linux computers. Desktops, laptops and Chromebooks are ok but it is not available for iPads, iPhones, android smart phones or android tablets.
Musescore does lots of things. You can compose, edit & arrange music, if you have those interests & skills, or you can just use it as a music player to rehearse & learn your music.
Musescore works best with its own Musescore files but it also works well as a midi file player. If you have a midi file for a piece of music and you open the file with Musescore, you will see on-screen a score of the piece and you can rehearse with it as described below.
Musescore is available for download at https://musescore.org. At that site, as well as download links, there is a lot of information about the program, an on-line and a downloadable hand book and many tutorials on the various things you can do with the program.
2. Using Musescore To Rehearse Music
Figure 1: The Musescore main screen
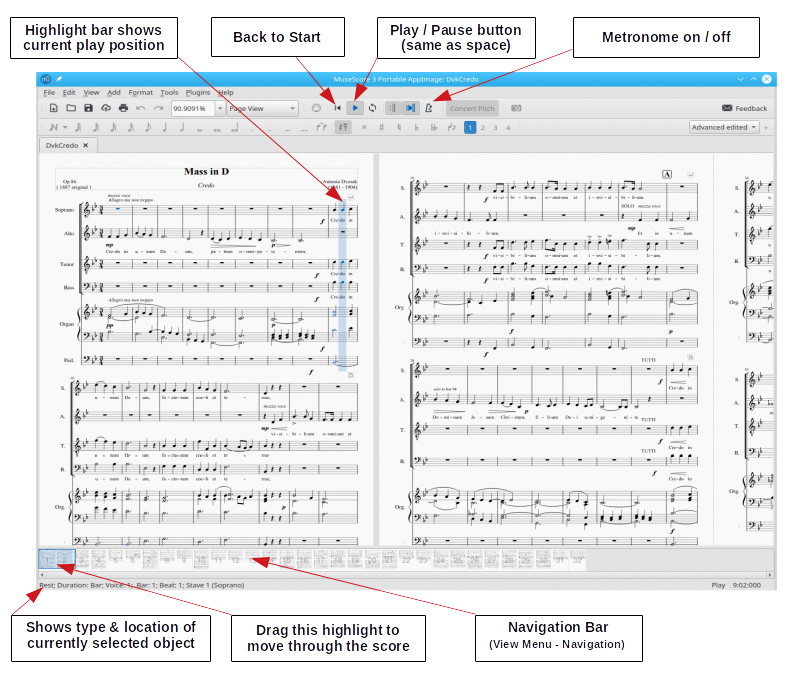
If you have a musescore file for a piece of music, you can open it using the Musescore program and you will see on screen the score of the piece in question. A typical example is shown above. With a Musescore file you will see most of the things you expect in a choral score; one or more staves of standard notation, each vocal line with its own lyrics, dynamics, expression markings & so on.
You can also open midi files with Musescore but with a midi file you will usually see just the staves and the notes but no lyrics.
Once the score is on-screen, you can press the space bar, the music will start playing and a highlight bar will move through the score showing the current play position. Pressing space again pauses the playback and pressing it yet again resumes playback from wherever it had paused. You can move around through the score by dragging it on-screen. You can zoom in and out on the score by holding the Ctrl key and scrolling the mouse wheel. You can select any note by clicking on it and you should hear it play. Once you have selected a note, if you press the spacebar then the score starts playing onwards from that point. Doing this you can easily work back & forth through the score, repeating any portions that you need to work on in more detail.
3. What Does It Sound Like ?
In Musescore for a typical piece of SATB choral music, all the voices and the accompaniment may play as a piano sound or the voice parts may each sound as a different instrument. For example, SATB may instrumented as flute, oboe, clarinet & bassoon set against piano in the accompaniment. This makes the individual parts easier to follow. Musescore allows you to change the SATB voices to other instruments if you wish.
4. Altering The Loudness Of Voice Parts – The F10 Mixer Window.
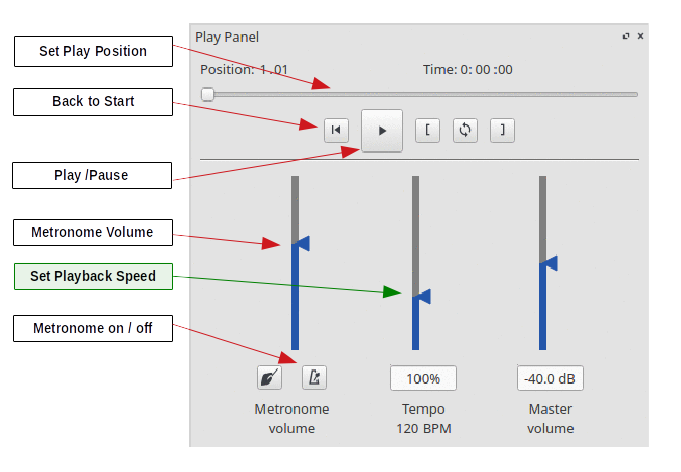
Initially when rehearsing you’ll probably want to hear your own voice part emphasised, i.e. made louder than the accompaniment and the other voices. To do this, press the F10 key and a special “mixer” window will pop up. This has sliders, one for each line of the score, and these control the playback volume of the corresponding part. With this, it’s easy to set your own part volume higher than the others or, for the same effect, lower all the other parts while leaving your own volume somewhere near maximum. To hide the mixer window press F10 again. You'll probably want to do this when you actually start singing.
When you think you know your part, you can re-set all the parts to the same volume and see how you get on singing against (with ?) the full ensemble.
Figure 2 : The Musescore mixer
(press F10 to activate, F10 to hide)

In the mixer window, you can also “pan” each voice part, i.e. move it to the left or right speaker or headphone.
This window is also where you can change the instrument sounds corresponding to the voice parts. To do this, follow the green boxes in the above diagram.
5. Changing Playback Speed – the F11 Play Panel Window
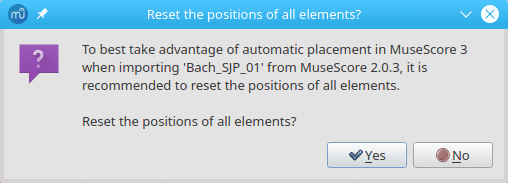
While first learning your part you may want to play the music back more slowly & later set it back up to full speed. To do this in Musescore, first press the F11 key to pop up the “Play Panel” At the top of this panel there is one horizontal slider and some play control buttons. Below these are three vertical sliders. These control a metronome sound that can be used during playback, the playback speed and the overall (Master) volume. Move the Tempo slider downwards to slow down playback or upwards to speed it up. Indicators near the Tempo slider show the current tempo, in crotchet beats per minute, and what percentage this is of the original tempo.To hide the Play Panel press the F11 key again.
Figure 3 : The Musescore Play panel
(press F11 to activate, F11 to hide)
At the top of the Play Panel window there are some other playback controls. With these you can start and stop playback at any point or jump back to the start of the piece. You can also mark a start and a stop bar and play repetitively between these bars. This can be very useful for rehearsing difficult passages in a piece. You can, for example, select a difficult passage, reduce the playback speed initially while you learn the notes and the text, and repeat the passage till you can sing it properly. After that, you can reset playback to the proper speed and see how you fare.
6. About Musescore Files
These are usually quite small (<100Kbytes) and most commonly have the extension .mscz. The z indicates that they are compressed or “zipped’ up. The small file size makes them convenient to send as email attachments. There is another file type .mscx which is not zipped and typically 10 – 20 times larger than the zipped version. mscx files are actually text files and, in principle, could be edited using Notepad or any other basic text editor.
Importantly, Musescore can both read and write files in music xml format. These typically have extensions .mxm or .musicmxl
The Choral Public Domain Library (cpdl) at https://www.cpdl.org/ is a large on-line collection of choral music. It claims to have “ … free scores of at least 34230 choral and vocal works by at least 3421 composers” Some of the cpdl works are available as Musescore files and many more are available as music xml or as midi files. Since Musescore can read all these formats, there is in practice a very wide range of rehearsal material available to Musescore users.
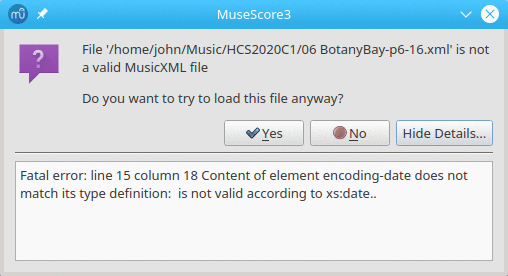
In 2019 the Musescore program changed from version 2 to version 3. Files created in version 2 can be read by version 3 but not vice versa. When the version 3 program opens a version 2 file for the first time it offers to “reset the position elements” of the score. This can be disconcerting for the user but clicking “yes” in this dialog will always be a safe option.
Musescore version 2 cannot read files from version 3, and version 3 files are becoming increasingly common. If you are using the older version, you should upgrade to version 3 as soon as convenient. It's a simple process. Just go to https://musescore.org and install the latest version ( 3.4.2 as at 18/3/2020 ) over your old one. User preferences & settings will be carried over unchanged.
7. Tips and Tricks I - Navigation
- To zoom in and out on the score hold the Ctrl key and scroll with the mouse wheel.
- You can move through the score by clicking on it and dragging it in the main window. When doing this, be careful to click on a blank part of the page. If you accidentally click on a part of the score, you will drag that item around within the score. This can have very strange effects on the music. If you make an accidental change, you can usually reverse it by entering Ctrl-Z.
- To jump to the start or end of the score use the Home or End key on the keyboard.
- To jump to a specific bar, type Ctrl-F then enter the bar number you want.
- To open a navigation bar at the bottom of the screen, go to the View menu & tick the Navigator box. Your current page is highlighted in this bar and you can drag the highlight to move around very rapidly within the score. To close the navigation bar, un-tick the box.
8. Tips And Tricks II - Ignore "Corrupted" Files
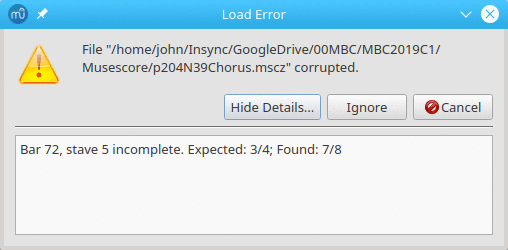
When you first open a Musescore file the program may complain that the file is “corrupted”. Usually you can just ignore this, open the file anyway, and all will be well.
There are a few reasons why this might occur. One is that Musescore expects to see certain time and date information in the file and some programs either put this in the wrong format or leave it out entirely. Though Musescore flags this as an error, everything seems to work anyway.
A second reason for error messages is that Musescore sometimes sees bars where one of the staves has the wrong number of beats. This happens occasionally where something has been subtly misplaced within a complicated piano accompaniment.
It is generally safe to ignore these error warnings.
9. Rehearsing With Musescore vs MP3 files
With mp3 files you have a basic play-listen-rewind rehearsal tool that can be used in many different places and circumstances. Musescore provides a more detailed rehearsal capability but has something of a learning curve and is usable only on a fully fledged PC device.
Table 1 compares the two systems in more detail.
| Capability | Musescore | MP3 file / player |
|---|---|---|
| Visualisation / visual cues | Complete view of the score as it plays | None, audio only |
| Navigation / control | Easy to stop / start / repeat individual passages | Difficult. Only a time line available. |
| Volume control of individual voice parts | Available | Not available. (Levels fixed when file is created) |
| Playback speed control | Available | Not available |
| Vary music pitch | Transpose up or down in semitone increments | Not available |
| File types | Musescore, midi, music XML | mp3 only |
| mp3 playback | no | yes |
| System / hardware requirements | desktop or laptop PC, Mac or Linux. Also Chromebook | As for Musescore plus iPhones, iPads, android phones & tablets, personal music players, car audio systems |
| Print capability | Can print full score. Also extract and print individual parts | None |
| Music / notation editing | Fully capable, comparable with Sibelius, Noteworthy Composer etc | None |
10. Making your own MP3 voice parts
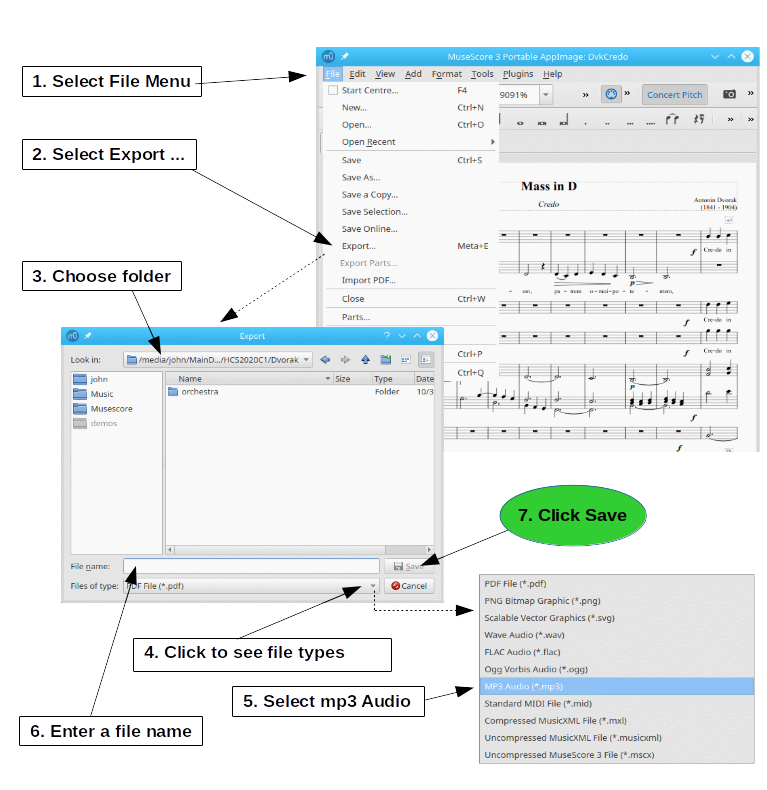
As well as playing a score, Musescore can “export” it to an mp3 file. You can use this capability to make your own mp3 voice part files. If you have set Musescore to play with your part emphasized and at a tempo that suits you, then this can be replicated in an mp3 file.
To do this, first set up whatever voice part volume and performance tempo suit you. Then:
- Go to the File menu
- Select “Export ...” to activate the Export window
- In the Export window choose the folder where you want to save the mp3 file
- Click the “Files of type:” button (bottom right) to get a drop down list of available exports
- In that list select “MP3 Audio (*.mp3)
- In the “File name:” box of the Export window enter a name for the file you wish to create.
- Click “Save” to create and save the file in the chosen folder.
Diagramatically:
Figure 4 : Making mp3 files
Once you have your voice part mp3 file you can transfer it to other devices, smart phones, tablets, car audio players etc and listen to it away from the desktop PC at your convenience.
By following this procedure and resetting the volume for each individual voice you can, if you wish, make a complete set of voice parts for others to use.